When designing BIRT reports that contain charts, the developer has many ways a chart can be customized. One way is to implement a script event handler either in JavaScript or Java. The chart engine currently supports over thirty hooks for implementing an event handler. These events are fired during the generation and rendering of the chart. Many items can be customized. For example, the data for a chart can be changed in the afterDatasetFilled script, or the entire chart model can be changed in the beforeGeneration script.
In addition to changing the chart using the chart scripting hooks, the chart model can also be changed using the primary BIRT report script hooks. When making changes to the report, most developers will use the beforeFactory event script. This event is fired prior to running the report and offers a location to make simple or complex changes to the report. This includes modifying any charts that exist within the report. Simple chart properties can be changed using the Chart Simple API. An example of this approach is described here.
For more complex changes, the Chart API can be called within the script. As an example, changing a specific chart series type is possible. BIRT 2.5 provides study charts which allow multiple Y-axes to be stacked, each with a different series type. Turning this feature on or off can also be done using script. These two changes can be done with the following script:
First import the API packages that will be needed.
 importPackage(Packages.org.eclipse.birt.chart.model.data.impl);
 importPackage(Packages.org.eclipse.birt.chart.model.type.impl);
 importPackage(Packages.org.eclipse.birt.chart.model.attribute.impl);
Retrieve the report design handle and find the chart. Note that the chart needs to be named. This can be done in the general properties for the chart.
 //Chart must be named
 cht = reportContext.getDesignHandle().findElement("MyChart");
 //get the chart model;
 mychart = cht.getReportItem().getProperty( "chart.instance" );
Next retrieve the axes. In this example the chart has two Y-Axes. The second one contains the series to be modified.
  xAxis =mychart.getAxes().get(0);
  yAxis2 = xAxis.getAssociatedAxes().get(1);
Clear all series definitions defined for the second Y-axis.
yAxis2.getSeriesDefinitions().clear();
The example report contains a combo parameter that allows the user to select the series type for the second Y-Axis. The parameter is checked and an appropriate series is created. Note that if an area series is created, the background is set to translucent.
 if( params["SeriesType"].value == "Line"){
  var ns = LineSeriesImpl.create();
 }else if( params["SeriesType"].value == "Bar"){
  var ns = BarSeriesImpl.create();
 }else if( params["SeriesType"].value == "Area"){
  var ns = AreaSeriesImpl.create();
  ns.setTranslucent(true);
  ns.getLineAttributes().setColor(ColorDefinitionImpl.TRANSPARENT())


 }
Create a new series definition and set the appropriate query and series type.
 var sdNew = SeriesDefinitionImpl.create();
  sdNew.getSeriesPalette( ).shift( 0 );
 ns.getLabel().setVisible(true);
 var qry = QueryImpl.create("row[\"QUANTITYORDERED\"]" );
 ns.getDataDefinition().add(qry)
 sdNew.getSeries().add( ns );
Assign the new series definition to the second Y-Axis.
yAxis2.getSeriesDefinitions().add( sdNew );
The example report also has a Boolean parameter that determines if the chart should be displayed as a study chart.
 if( params["StudyChart"].value == true ){
  mychart.setStudyLayout(true);
 }else{
  mychart.setStudyLayout(false);
 }
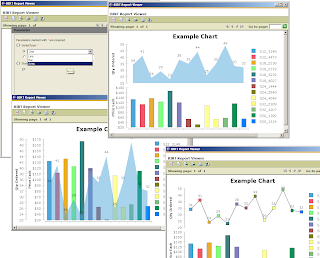
Some of the output options for this example report are displayed below.
This report is available at Birt-Exchange.
Wednesday, August 26, 2009
Using Script to Modify a BIRT Chart
Subscribe to:
Post Comments (Atom)


2 comments:
It works for me!! But I lost the previous configured interactivity at onclick --> invoke script :(
How do I change the X-Axis?
Post a Comment